Unveiling Port Forwarding in Mikrotik: A Complete Guide with Winbox
In the universe of networks and telecommunications, port redirection is a crucial functionality for those seeking to extend the accessibility of internal services and devices to the internet. Whether for remotely monitoring security cameras, hosting a game server, or accessing internal systems from anywhere, mastering the configuration of Port Redirection in Mikrotik (Port Forwarding) is a differentiator. This definitive guide was developed to demystify the process, using the intuitive Winbox interface to make configuration accessible to everyone, from enthusiasts to network professionals. Prepare to unleash the potential of your Mikrotik network, ensuring connectivity and security.
What is Port Redirection (Port Forwarding) and Why is it Essential in Mikrotik?
Port redirection, widely known as Port Forwarding, is a Network Address Translation (NAT) technique that allows external requests from the internet to be directed to a specific device or service within a local area network (LAN) protected by a router. Think of your Mikrotik router as an intelligent doorman: it receives all traffic (data) addressed to its public IP. Without Port Forwarding, the doorman would not know which “apartment” (internal device) to deliver a specific request that does not have a clear recipient. The Mikrotik port redirection configuration creates a precise rule: “If a request for port X arrives, forward it to device Y, on port Z”.
This functionality is vital for scenarios where internet traffic needs to reach a specific device on your internal network. For example, if you have a web server running on port 80 within your network, Port Forwarding ensures that all external HTTP requests are directed to that server, and not to another device. The configuration is mainly done through the robust NAT (Network Address Translation) rules in the Mikrotik firewall, and Winbox greatly simplifies this process, making it accessible even for those without deep command-line knowledge.
Essential Prerequisites for Port Redirection in Mikrotik
Before starting the practical configuration of port redirection in Mikrotik with Winbox, it is essential to ensure that you have the following items in order. This will ensure a smooth process and avoid setbacks:
1. Reliable Access to the Mikrotik Router via Winbox
Winbox is the official and most used graphical tool for managing Mikrotik routers. Make sure you have the latest version of Winbox installed on your computer and that you can establish a stable connection with your router. You will need the router’s IP address (or MAC address) and login credentials (username and password). Having this pre-established connection is the first step to success.
2. Precise Identification of Internal IP and Service Port
For effective port redirection, you must know the local (private) IP address of the device or server that will receive the traffic. In addition, it is crucial to know which port (or ports) that specific service is using. For example:
- Web servers: generally use port 80 (HTTP) or 443 (HTTPS).
- Security cameras: may use specific ports defined by the manufacturer.
Write down this information in detail, as it is the basis for correct configuration in Winbox.
3. Active Internet Connection and Public IP
Check if your Mikrotik router is connected to the internet and if you have a valid public IP address. It is important to note that some internet providers use CGNAT (Carrier-Grade NAT), which may make direct Port Forwarding unfeasible. If this is your case, contact your provider to request a dedicated public IP or explore alternative solutions, such as VPNs.
4. Basic Network Knowledge (Recommended)
Although this guide is quite detailed and practical, a basic understanding of network concepts such as IP addresses, TCP/UDP ports, and NAT operation can facilitate understanding and debugging of possible problems. However, the step-by-step guide has been designed to be clear and accessible, allowing even beginners to confidently perform the configuration.
Check out the article “MikroTik Firewall: Complete Guide to Protecting Your Network with RouterOS” — ideal for those who want to better understand MikroTik’s firewall features or, if you already have experience, go straight to the practical configurations!
With these prerequisites in mind, we are ready to move forward and configure port redirection in Mikrotik efficiently and securely, using the power of Winbox.
Configuring Port Redirection in Mikrotik: Step-by-Step Guide with Winbox
The configuration of port redirection in Mikrotik is a process that focuses on NAT (Network Address Translation) rules within the firewall. Fortunately, Winbox offers a graphical interface that simplifies each step. Follow this detailed guide to effectively configure Port Forwarding:
Accessing the Firewall Menu in Winbox
To start configuring your Mikrotik for port redirection:
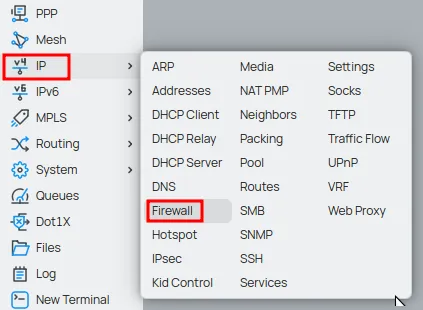
- Open the Winbox application on your computer. If you don’t have it yet, download it from the official Mikrotik website. Connect to your Mikrotik router using the IP or MAC address and your login credentials.
- In the main Winbox menu, located on the left side of the screen, click on “IP” and then select “Firewall”. This action will open the Firewall settings window, the heart of your router’s security and NAT management.
Creating a New NAT Rule (DST-NAT) in Mikrotik
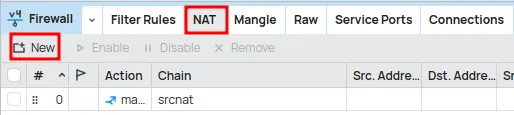
In the “NAT” tab, you will see a list of existing rules (if any). To add a new Mikrotik port redirection rule:
- Click the “New” or “+” (plus sign) button to open the “New NAT Rule” window. This is the interface where you will define the specific parameters of your Port Forwarding.
Configuring the “General” Tab of the NAT Rule
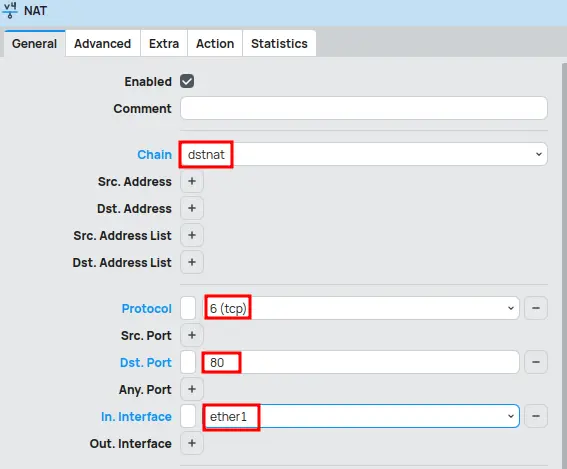
The “General” tab is where you define the criteria for traffic to be matched and redirected. Fill in the fields carefully:
1.Chain: Select dstnat (Destination NAT) from the dropdown menu. This is the correct choice because the goal is to change the destination address of the packet (your router’s public IP) to the internal IP address of your server or device. Dstnat is the key to redirecting external connections to a specific destination within your local network [2].
2.Protocol: Choose the protocol that the service you are redirecting uses. The most common options are:
- tcp (Transmission Control Protocol): Used by most web services (HTTP, HTTPS), email, etc.
- udp (User Datagram Protocol): Common for video streaming, online games, and VoIP.
Tip: If the service uses both protocols, you will need to create two separate rules: one for TCP and one for UDP.
3.Dst. Port: Enter the external port number you want to redirect. This is the port that will be accessed from the internet. Examples include 80 (HTTP) or 443 (HTTPS) for web servers, or specific ports for other services (such as IP cameras, game servers, etc.).
4.In. Interface: Select the input interface through which external traffic will arrive at your router. Generally, this will be your WAN (Wide Area Network) interface, which is connected to the internet (e.g., ether1-gateway or the name of your internet interface). Defining the input interface ensures that the rule applies only to traffic originating from the internet, increasing security.
Configuring the “Action” Tab of the NAT Rule for Final Redirection
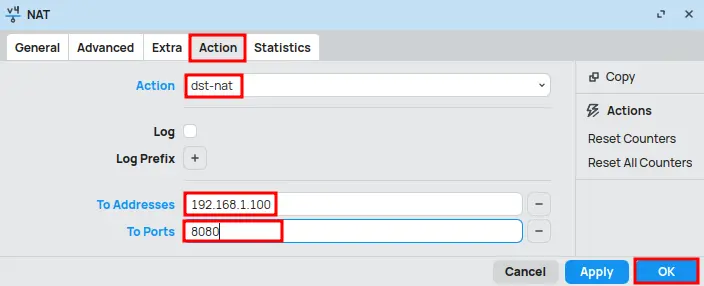
After defining the criteria in the “General” tab, it’s time to specify the action Mikrotik will take when traffic matches your rule. Click on the “Action” tab:
- Action: In the dropdown menu, select dst-nat. This action confirms that the packet’s destination will be translated to a new address.
- To Addresses: Enter the internal IP address of the device or server to which the traffic will be redirected. This is the local IP you identified in the prerequisites (e.g., 192.168.1.100).
To Ports: Enter the internal port of the device or service. In most cases, this will be the same port you specified in “Dst. Port” in the “General” tab. However, Mikrotik allows you to redirect an external port to a different internal port, which is useful for increasing security or avoiding conflicts (e.g., external port 80 to internal port 8080).
After configuring all fields, click “OK” to save the new NAT rule. The rule will be added to the list in the Firewall’s “NAT” tab, ready to function.
Final Considerations and Best Practices for Port Forwarding in Mikrotik
Configuring port redirection in Mikrotik is a valuable skill that expands your network’s functionalities. However, it is crucial to adopt some considerations and best practices to ensure the security, efficiency, and stability of your network environment:
- Keep services updated, use strong passwords, and avoid opening unnecessary ports.
- Prefer non-standard ports for internal services and ensure devices have static IPs or DHCP reservations.
- Document all redirection rules and perform regular tests, especially after updates.
With these precautions, your network becomes more efficient and protected against unauthorized access.
Conclusion: Unleash Your Network’s Potential with Mikrotik Port Forwarding
Port redirection in Mikrotik, when correctly configured via Winbox, is an incredibly powerful tool that significantly expands your network’s capabilities. It allows secure and efficient remote access to internal services and devices, transforming your router into a versatile connectivity hub. With this detailed guide, you have acquired the necessary knowledge to implement Port Forwarding effectively and securely. Always remember to prioritize security and follow recommended best practices to protect your network from threats. Now, you are fully capable of connecting your internal world to the vast universe of the internet, with Mikrotik acting as your reliable and efficient guardian.
Now we recommend reading the following article here on the blog:
- How to Open Internal Port in MikroTik Firewall using Winbox: Practical Guide with Real Example – A complete step-by-step guide with an applied example to facilitate understanding.
These complementary readings will help clarify important concepts and ensure a more secure and effective application of configurations.
Visit the EMNews blog and stay up-to-date with the latest news, analyses, and trends in the world of technology and telecommunications!