Authentication and Control with PPPoE
For Internet Service Providers (ISPs) and network administrators who need a robust method to authenticate users and control network access, PPPoE (Point-to-Point Protocol over Ethernet) is the ideal solution. Implementing a PPPoE server on a MikroTik router allows centralized client management, speed profile assignment, monitoring usage, and ensures that only authorized users access your network.
What is PPPoE and Why Use It?
PPPoE is a network protocol that encapsulates PPP packets inside Ethernet frames. Simply put, it creates a dedicated connection “session” for each user, requiring a username and password for authentication. This is the same technology used by many broadband providers to connect their customers to the Internet. The main advantages of using a PPPoE server on MikroTik are:
- Centralized Authentication: Control who can connect to your network.
- Bandwidth Control: Set upload and download speed limits for each user or group of users.
- Client Isolation: Each client operates in their own session, improving security.
- Accounting and Monitoring: Track connection time and data traffic of each user.
This complete guide will show you how to configure a PPPoE server on your MikroTik using Winbox, the graphical management tool that makes the process visual and intuitive.
Prerequisites
Before you start, make sure you meet the following prerequisites:
- MikroTik Configured with Internet Access: Your MikroTik router must already be set up with a working WAN connection and Internet access. The interface that will serve PPPoE clients (your LAN network) must also be configured.
- Winbox Installed: You must have Winbox downloaded and administrator access to your MikroTik router.
If you have not yet configured basic Internet access on your MikroTik, check our previous guide on initial MikroTik setup with Winbox.
Configuring the PPPoE Server: Step by Step in Winbox
Setting up the PPPoE server on MikroTik involves four main steps: creating an IP pool for clients, defining a connection profile, creating users (secrets), and finally enabling the server on a specific interface.
1. Create an IP Pool for PPPoE Clients
The first step is to reserve a range of IP addresses that will be dynamically assigned to clients when they connect.
- In Winbox, go to the menu IP > Pool.
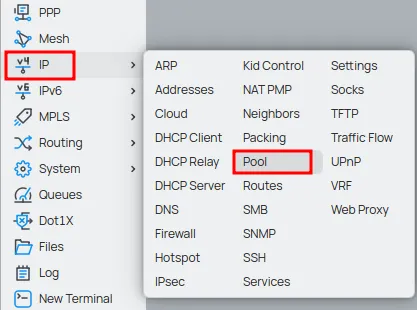
- In the IP Pool window, click the New button (or the + icon) to add a new pool.

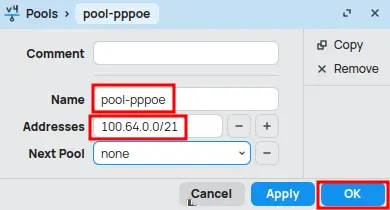
- Name: Enter a descriptive name for your pool (e.g., pool-pppoe).
- Addresses: Set the range of IPs that will be used. For example: 100.64.0.0/21.
Make sure this range does not conflict with other networks already configured.
Click OK to save.
2. Create a Profile for PPPoE Clients
The profile defines rules and limits for clients that connect using it, such as the IP pool they will use and bandwidth restrictions.
- In Winbox, go to the PPP menu.
- Select the Profiles tab.
- Click the New button (or the + icon) to add a new profile.

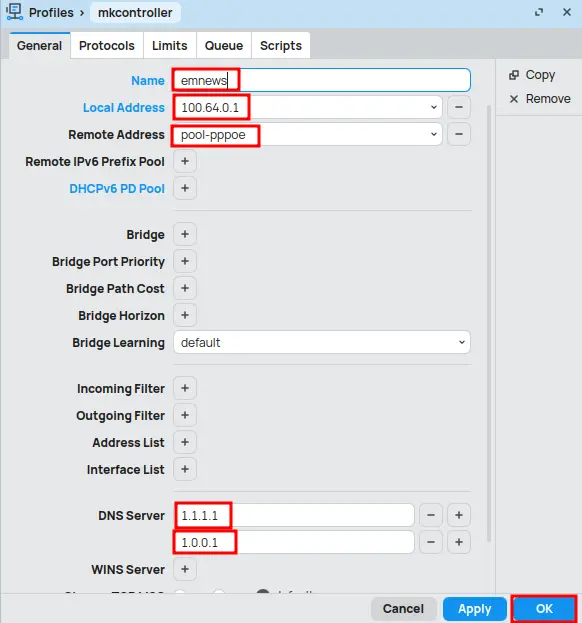
General Tab:
- Name: Assign a name to the profile (e.g., emnews).
- Local Address: Set the IP address of the router that will act as the gateway for PPPoE clients. This must be an IP from the same subnet as the pool you created (e.g., 100.64.0.1).
- Remote Address: Select the IP pool created in the previous step (pool-pppoe).
- DNS Server: set the IP addresses of the DNS servers that will be automatically distributed to users connected via PPPoE.
Click OK to save the profile.
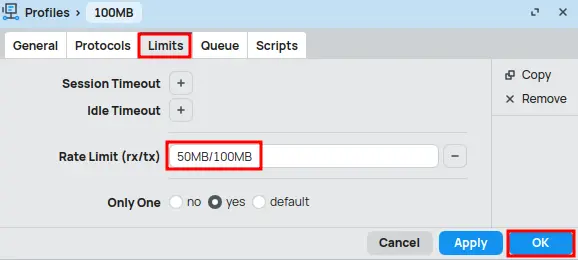
How to Configure PPPoE Profile on MikroTik for Internet Plans
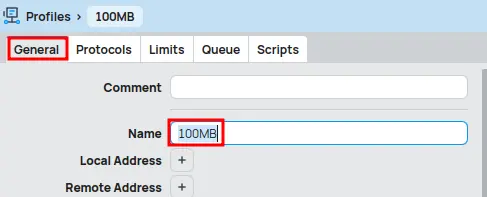
In the Profiles tab, click New (or the + icon) to create a new profile.
General Tab:
- Name: Enter a name for the profile (e.g., 100MB).
Limits Tab:
- Rate Limit (rx/tx): Configure the maximum download and upload speed for the client (e.g., 50M/100M).
- Only One: Enable this option (yes) to allow only one active PPPoE session per user.
Click OK to save.
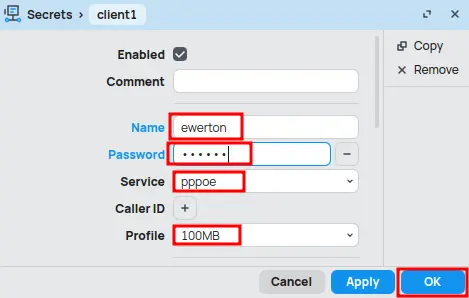
3. Create a Secret (Username and Password)
The “secret” is the credential (username and password) that the client will use to authenticate on the PPPoE server.
- Still in the PPP menu, select the Secrets tab.
- Click the New button (or the + icon) to add a new secret.

- Name: Enter the username for the client (e.g., ewerton).
- Password: Enter the password for this client.
- Service: Select pppoe.
- Profile: Choose the profile created in the previous step (e.g., 100MB).
Click OK to save the user.
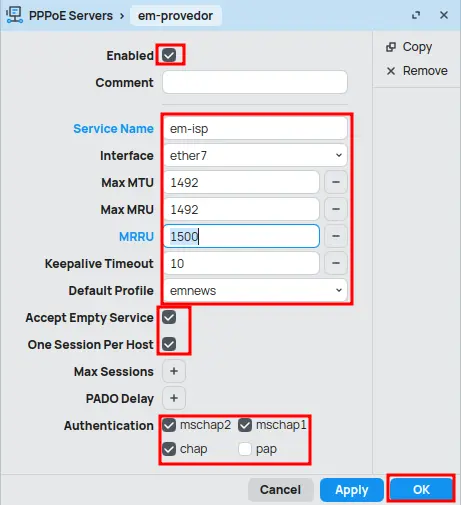
4. Enable the PPPoE Server on Mikrotik
Now that we have the pool, profile, and user set up, the final step is to enable the PPPoE server on one of the MikroTik interfaces.
- Still in the PPP menu, select the PPPoE Servers tab.
- Click the New button (or the + icon) to add a new PPPoE server.

- Service Name: Assign the PPPoE server name (e.g., em-isp).
- Interface: Select the Ethernet interface where the PPPoE service will run (e.g., ether7).
- Max MTU / Max MRU: Keep the default value at 1492.
- MRRU: Set to 1500.
- Keepalive Timeout: It is recommended to keep at 10 seconds for connection stability.
- Default Profile: Select the previously configured PPPoE profile (e.g., emnews).
- Accept Empty Service: Enable this option to allow clients to connect even without specifying a service name.
- One Session Per Host: Activate this option to limit only one PPPoE session per MAC address.
- Authentication: For better security, disable the PAP option and keep other authentication methods enabled.
Click OK.
Done! Your PPPoE server is now configured and ready to accept connections. Clients can now configure a PPPoE connection on their own routers or computers using the username and password you created.
Conclusion: PPPoE Server on MikroTik in Operation
With this guide, you successfully configured a PPPoE server on your MikroTik router using Winbox. You learned how to create IP pools, set connection profiles, manage users, and enable the PPPoE service, as well as apply security measures. A PPPoE server provides granular control over your network users, allowing efficient management of resources and security. Practice and experimentation are key to mastering MikroTik. Explore the many features RouterOS offers to further optimize your network.
Visit the EMNews blog and stay up-to-date with the latest news, analyses, and trends in the world of technology and telecommunications!
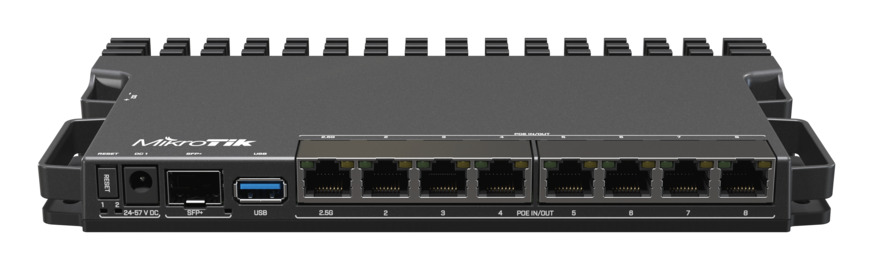
The MikroTik RB5009UG+S+IN router is ideal for Internet Service Providers (ISPs) looking to set up a high-performance PPPoE server, ensuring efficient client management and increased profitability in broadband delivery.