In today’s networking landscape, security and remote accessibility are crucial for businesses and home users. Virtual Private Networks (VPNs) play a key role in providing a secure connection over a public network, such as the internet. Among the various available VPN protocols, L2TP/IPSec (Layer 2 Tunneling Protocol over Internet Protocol Security) stands out for offering a robust balance between security and compatibility. When we implement L2TP IPSEC on Mikrotik, combined with the IP Cloud functionality, the remote access configuration becomes even more flexible and manageable.
This article will detail the process of configuring an L2TP/IPSec server on a MikroTik router, covering everything from the essential prerequisites to the steps of configuring the VPN server and integrating it with the IP Cloud service. Our goal is to provide a practical and comprehensive guide so that you can implement a secure and efficient remote access solution, ensuring that your devices can connect to your MikroTik network from anywhere, at any time, even without a static public IP.
Prerequisites for configuring L2TP IPSec on MikroTik
Before starting the L2TP/IPSec configuration on your MikroTik router, it is essential to ensure that the following prerequisites are met to avoid problems and ensure a successful implementation:
- MikroTik Router with Updated RouterOS: Make sure your MikroTik device is running the latest version of RouterOS. Frequent updates bring security improvements, bug fixes, and new features. You can check and update the RouterOS version through WinBox or the command line.
- Administrative Access to MikroTik: You will need full access (user with administrator privileges) to your MikroTik router, either via WinBox, WebFig, or SSH/Telnet.
- Internet Connectivity: The MikroTik router must have an active internet connection. For L2TP/IPSec to work correctly, the router will need a public IP address. If you are behind a NAT (Network Address Translation) from your internet provider, you may need to configure port forwarding for UDP ports 500 (IKE), 1701 (L2TP), and 4500 (IPSec NAT-T) to your MikroTik router. IP Cloud will help resolve the dynamic IP issue, but external accessibility still depends on the public IP.
- IP Address Pool for VPN Clients: Define a pool of IP addresses that will be assigned to connecting VPN clients. This pool must be from a different subnet than your local network to avoid IP conflicts.
- DNS Server: Have a DNS server configured on your MikroTik or use public DNS servers (like Google’s 8.8.8.8 and 8.8.4.4) so that VPN clients can resolve domain names.
- Basic Networking Knowledge: Familiarity with networking concepts such as IP addressing, subnets, NAT, and firewall will be helpful to understand and troubleshoot potential problems during configuration.
With these prerequisites in order, you will be ready to proceed with the configuration of the L2TP/IPSec server on your MikroTik.
For the VPN to work in the real world, it is crucial to have a Public IP provided by the Internet provider, whether it is dynamic or fixed.
Configuring the L2TP/IPSec Server on MikroTik (via WinBox)
The configuration of the L2TP/IPSec server on MikroTik can be done intuitively using WinBox, the graphical management tool from MikroTik. Follow the steps below to configure your VPN server:
1. Create an IP Address Pool for VPN Clients
First, we need to define a pool of IP addresses that will be used to assign IPs to connecting VPN clients. This pool must be from a different subnet than your local network to avoid IP conflicts.
Open WinBox and connect to your MikroTik router.
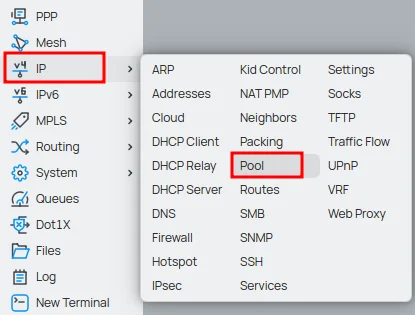
In the side menu, click on IP > Pool.
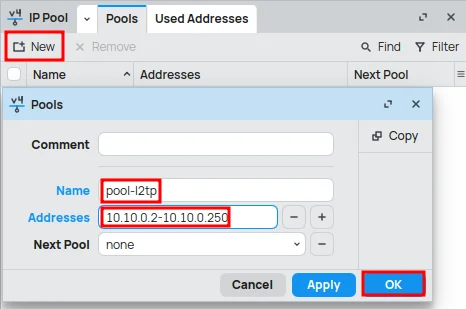
Click the New button (or the + icon).
In the Name field, give your pool a descriptive name (e.g., pool-l2tp).
In the Address field, enter the IP range, for example, 10.10.0.2-10.10.0.250. Adapt this range to your needs, ensuring there is no conflict with your internal network.
Click OK.
2. Create a PPP Profile for L2TP IPSec on Mikrotik
The PPP profile defines the settings for VPN clients, such as the IP pool to be used, DNS servers, and other options.
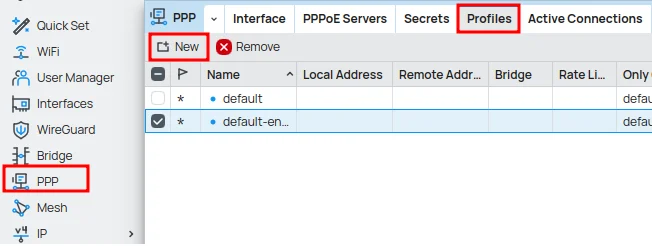
In the side menu, click on PPP.
In the Profiles tab, click the New button (or the + icon).
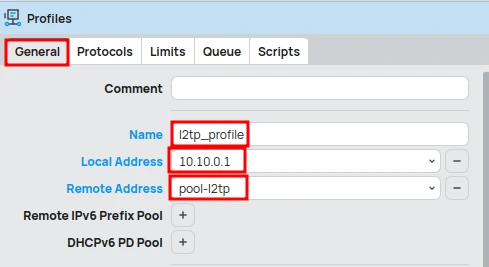
In the General tab:
- In the Name field, give your profile a descriptive name (e.g., l2tp_profile).
- In the Local Address field, enter the IP address that the MikroTik router will use as a gateway for VPN clients, for example, 10.10.0.1. Choose an IP within the vpn_pool subnet, but outside the distribution range to avoid conflicts.
- In the Remote Address field, select vpn_pool (the IP pool we created in the previous step, e.g., pool-l2tp).
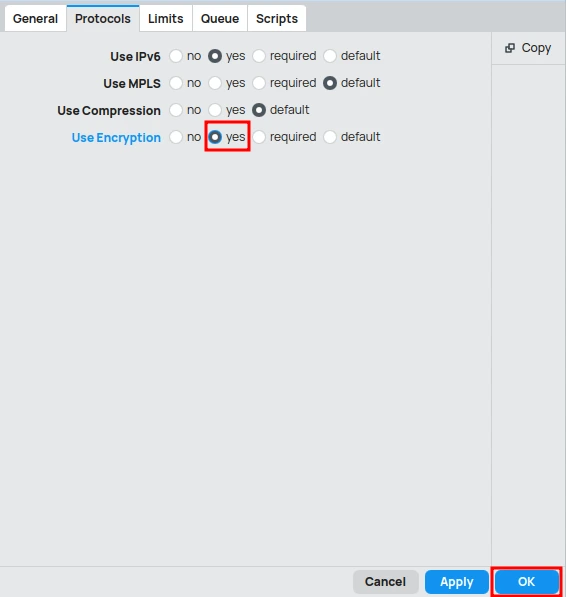
In the Protocols tab:
- Check the Use Encryption option as yes.
Click OK.
3. Create Users for VPN Access
For clients to be able to connect, you need to create users on the PPP server.
In the PPP menu, go to the Secrets tab.
Click the New button (or the + icon).

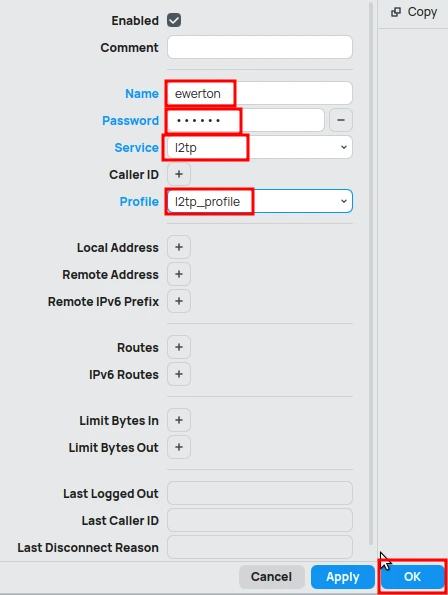
In the New PPP Secret window:
- In the Name field, enter the username for the VPN client, for example, ewerton.
- In the Password field, enter a strong password for the VPN client.
- In the Service field, select l2tp.
- In the Profile field, select l2tp_profile.
Click OK.
Repeat this step for each user you want to allow VPN access.
4. Enable the L2TP Server
Now, let’s enable the L2TP server and associate it with the profile we just created. We will also define an IPSec secret (Pre-Shared Key – PSK) for IPSec authentication.
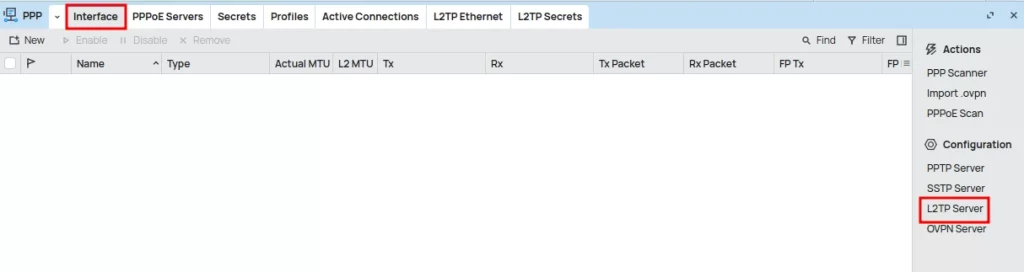
In the PPP menu, go to the Interface tab.
Click the L2TP Server button.
In the L2TP Server window:
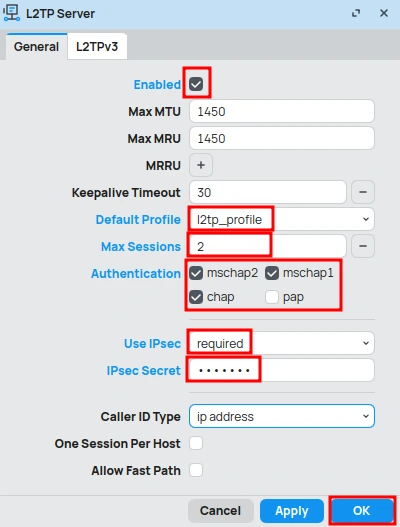
- Check the Enabled option.
- In the Default Profile field, select l2tp_profile.
- In the Max Session field, define the maximum number of simultaneous connections allowed for each user (for example, 2).
- In Authentication, uncheck the PAP option, as it is not secure. The other options can remain selected.
- In Use IPSec, set it to required to enable the IPSec requirement.
- In the IPSec Secret field, enter a strong and complex password for the IPSec secret. VERY IMPORTANT: This password will be used by VPN clients to authenticate the IPSec connection.
Click OK.
5. Configure Firewall Rules
It is essential to configure the firewall to allow L2TP/IPSec connections. You will need to allow UDP ports 500 (IKE), 1701 (L2TP), and 4500 (IPSec NAT-T), in addition to the ESP (IPSec) protocol.
In the side menu, click on IP > Firewall.
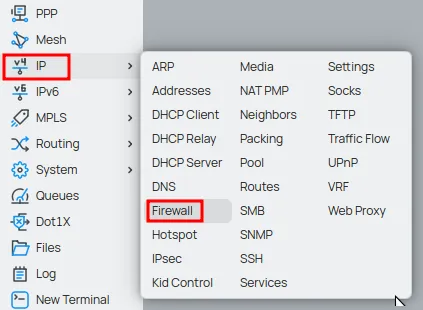
In the Filter Rules tab, click the New button (or the + icon).
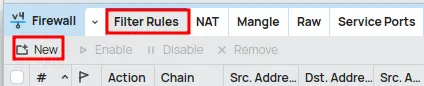
In the General tab:
- In the Chain field, select the input option.
- In Protocol, choose udp.
- In the Dst. Port field, enter the values “500, 1701, 4500” to release the respective ports.

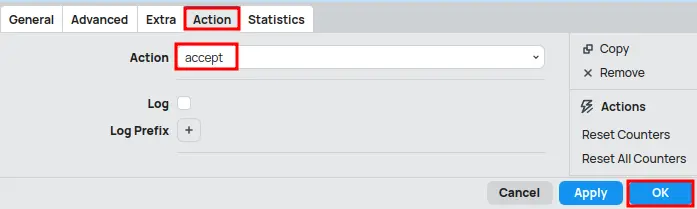
In the Action tab:
- In the Action field, select the Accept option to allow traffic.
Click OK.
Click the New button (or the + icon) again.
In the General tab:
- In the Chain field, select the input option.
- In Protocol, select (ipsec-esp).

In the Action tab:
- In the Action field, select the Accept option to allow traffic.
Click OK.
Enabling and Configuring IP Cloud on MikroTik
The MikroTik IP Cloud service is a feature that provides a dynamic domain name (DDNS) for your router, allowing you to access it remotely even if your internet provider assigns a dynamic public IP address. This is extremely useful for VPN connections, as you won’t have to worry about finding out your router’s current IP with each reconnection.
Enable the IP Cloud Service
Enabling IP Cloud is a simple process and can be done through WinBox:
In the side menu, click on IP > Cloud.
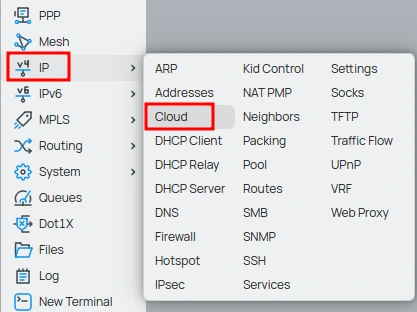
In the IP Cloud window:
- Check the DDNS Enabled option as yes.
- Check the Update Time option as yes (allows MikroTik to automatically update the system time via NTP, which is important for the validity of certificates and logs).
Click OK.
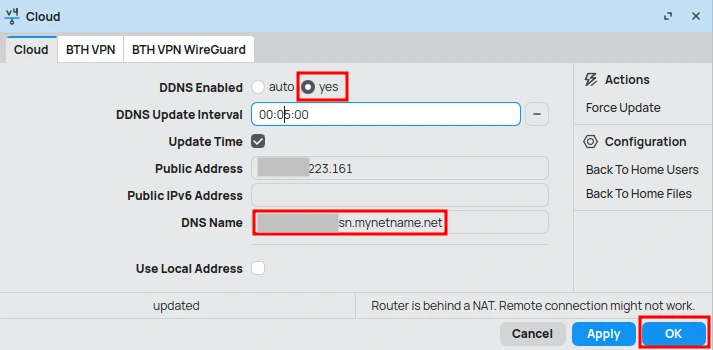
After enabling, MikroTik will connect to the MikroTik Cloud servers and register a dynamic domain name for your router.
Conclusion
The configuration of an L2TP/IPSec VPN server on a MikroTik router, combined with the IP Cloud functionality, offers a robust and flexible solution for secure remote access. By following the steps detailed in this article, you can establish an encrypted VPN connection that protects your data and allows access to your network resources from anywhere in the world, even with a dynamic public IP address.
It is essential to remember the importance of using strong and complex passwords for the IPSec secret and for the VPN user credentials, in addition to keeping RouterOS always updated to ensure maximum security. The correct configuration of firewall rules is also crucial to allow VPN traffic and protect your router against unwanted access.
With L2TP/IPSec and IP Cloud, MikroTik proves to be a powerful tool for building secure and accessible network infrastructures, meeting the remote connectivity needs for both corporate environments and individual users. We hope this guide has been useful for you to successfully implement your own VPN solution.
Now be sure to check out our full article “Configuring an L2TP IPSec VPN Client on Windows”, where you’ll find a detailed step-by-step guide to securely create and adjust your connection on Windows 10 and 11.
Don’t miss any news! Click the link below and join our WhatsApp channel to receive articles, reviews, and exclusive news about Mikrotik firsthand.
👉 https://whatsapp.com/channel/0029Va4pJbu47Xe79TIBxo1G
Visit the EMNews blog and stay up-to-date with the latest news, analyses, and trends in the world of technology and telecommunications!