Static routing is a fundamental technique for managing data flow in networks, especially in controlled environments with well-defined topologies. This article offers a complete guide on how to configure static routing on Mikrotik devices using the Winbox tool, detailing its concepts, advantages, disadvantages, and practical applications.
What is Static Routing?
Static routing is a manual method of directing network traffic between different IP networks. Unlike dynamic routing, which uses automatic protocols to discover and update routes, static routing requires the manual configuration of each route in the device’s routing table. This means the network administrator explicitly defines the path that data packets must follow to reach a specific destination.
Advantages and Disadvantages of Static Routing on Mikrotik
Understanding the strengths and weaknesses of static routing is crucial for deciding when to apply it in your network.
| Advantages | Disadvantages |
| Simplicity: Easy to configure and manage, ideal for smaller and simpler networks. | Lack of Adaptability: Does not automatically adjust to changes in network topology, requiring manual intervention. |
| Reliability: Routes are fixed and predictable, ensuring a consistent path for traffic. | Limited Scalability: Becomes complex and laborious in large networks with frequent changes. |
| Security: Allows for strict control over traffic flow, restricting access to specific networks. | Manual Management: Requires constant intervention to add, remove, or modify routes. |
| Efficiency: Can be more efficient in stable networks with well-defined topologies, as there is no overhead from routing protocols. | Potential for Errors: Manual configuration increases the risk of errors that can lead to connectivity problems. |
Applications of Static Routing on Mikrotik
Static routing is particularly useful in specific scenarios:
- Small and stable networks: Perfect for homes, small offices, or local networks with unchanging topology.
- Network segmentation: Allows isolating networks and controlling traffic between them, increasing security.
- Connections with external networks: Essential for establishing connections with internet providers or VPNs.
- Backup routing: Can be used as an alternative route in conjunction with dynamic routing to ensure service continuity.
Step-by-Step Configuration Static Routing on Mikrotik with Winbox
Configuring static routing on Mikrotik devices via Winbox is a straightforward process. Let’s consider a practical example where the goal is to allow communication between two distinct networks, connected by two Mikrotik routers (R-1 and R-2).
Example Scenario
- Router R-1: Network 10.0.1.0/24.
- Router R-2: Network 10.0.2.0/24.
- Interconnection Link: 100.70.0.0/30 (E.g., R-1 uses 100.70.0.1, R-2 uses 100.70.0.2).
The objective is for a PC on Router R-1’s network (10.0.1.0/24) to communicate with a PC on Router R-2’s network (10.0.2.0/24).
1. Accessing Mikrotik via Winbox
Connect to your Mikrotik device using the Winbox software. Ensure that Winbox is updated and that you have the correct access credentials.
2. Configuring Router R-1
To allow Router R-1 to reach Router R-2’s network, you need to add a static route:
In Winbox, go to the IP menu and select the Routes option.

In the Route List window, click the New button (or the + icon).

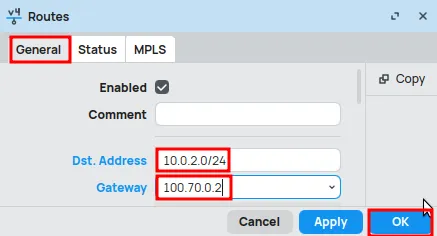
In the New Route window, fill in the fields as follows:
- Dst. Address: 10.0.2.0/24 (Destination network address of R-2).
- Gateway: 100.70.0.2 (Next-hop IP, which is R-2’s interface on the interconnection link).
Click OK to save the settings.
3. Configuring Router R-2
Similarly, for Router R-2 to be able to reach Router R-1’s network, add a static route:
In Winbox, go to the IP menu and select the Routes option.
In the Route List window, click the New button (or the + icon).
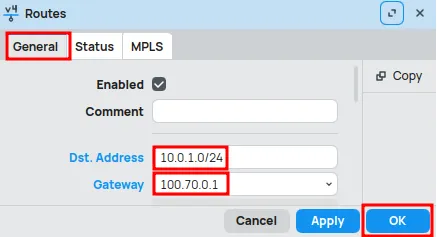
In the New Route window, fill in the fields as follows:
- Dst. Address: 10.0.1.0/24 (Destination network address of R-1).
- Gateway: 100.70.0.1 (Next-hop IP, which is R-1’s interface on the interconnection link).
Click OK to save the settings.
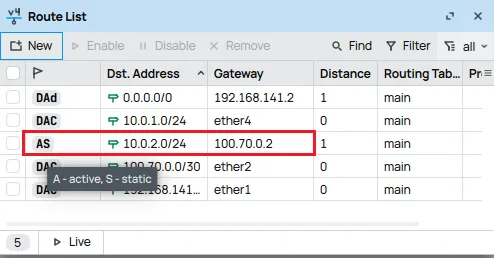
4. Verifying Configured Routes
After adding the routes, it is essential to verify that they have been applied correctly. On both routers, in the Route List window (IP > Routes), you will be able to see the new static routes with the status active.
5. Testing Connectivity
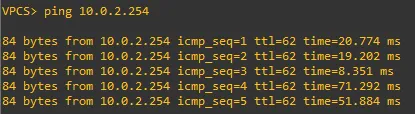
To confirm that routing is working, perform a connectivity test:
- On a computer connected to Router R-1’s network (e.g., 10.0.1.X), open the command prompt (Windows) or terminal (Linux/macOS).
- Execute the ping command to a device on Router R-2’s network (e.g., ping 10.0.2.254).
- If the ping is successful, you will see replies with the response time, indicating that communication between the networks has been established. Otherwise, review the router configurations.
Conclusion: Mastering Static Routing on MikroTik
Static routing on Mikrotik, configured through Winbox, is a powerful tool for network administrators seeking simplicity, control, and security in smaller networks or specific scenarios. By following this guide, you will be able to implement and manage static routes, ensuring efficient connectivity between your networks.
Don’t miss any news! Click the link below and join our WhatsApp channel to receive articles, reviews, and exclusive news about Mikrotik firsthand.
👉 https://whatsapp.com/channel/0029Va4pJbu47Xe79TIBxo1G
Visit the EMNews blog and stay up-to-date with the latest news, analyses, and trends in the world of technology and telecommunications!