Managing a network efficiently means automating repetitive tasks. One of the most important is the distribution of IP addresses. This is where the DHCP server comes in. Configuring a DHCP (Dynamic Host Configuration Protocol) server on a MikroTik router is a fundamental task for any network administrator, as it eliminates the need to manually configure each device that connects to your network.
This comprehensive guide will show you, step-by-step, how to configure a DHCP server on your MikroTik using the Winbox graphical tool, making the process accessible even for beginners.
What is a DHCP Server on MikroTik and why do you need one?
DHCP is a protocol that automates the assignment of IP addresses, subnet masks, gateways, and DNS servers to devices on a network. Imagine having to manually enter this information on every new smartphone, computer, or smart TV that connects to your Wi-Fi. It would be impractical.
Benefits of using a DHCP server on MikroTik:
- Simplicity: Eliminates manual IP configuration on each device.
- Efficiency: Prevents IP conflicts by ensuring each device has a unique address.
- Centralized Management: Facilitates the administration of network addresses from a single point.
- Scalability: Simplifies adding new devices to the network.
Prerequisites
Before starting the DHCP server configuration, you need two things:
- Access to your MikroTik router via Winbox.
- An IP address already configured on the network interface (usually a
bridgeor anethernetport) that will serve your local area network (LAN). This will be the gateway for your devices.
For this configuration scenario, Winbox version 4 was used, but the steps are similar for Winbox version 3.
Step-by-Step: Configuring the DHCP Server on MikroTik using Winbox
Let’s get to the configuration process. Winbox has a wizard called “DHCP Setup” that greatly simplifies the job.
Define the Interface IP Address (Gateway)
If you don’t have an IP on your local network interface yet, this is the first step.
In Winbox, go to the IP > Addresses menu.
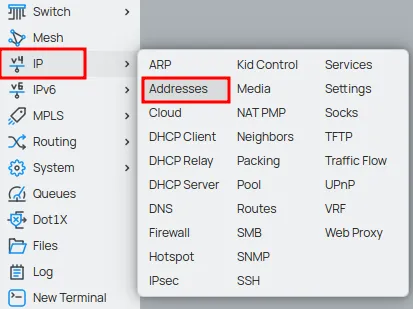
Click on “New” or the plus “+” button.

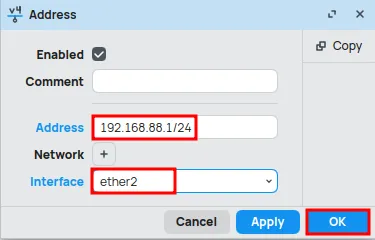
- Address: Enter the gateway IP with the CIDR mask (e.g.,
192.168.88.1/24). - Interface: Select your local network interface (e.g.,
ether2). - Click OK.
Use the “DHCP Setup” Wizard
Now, go to the IP > DHCP Server menu.
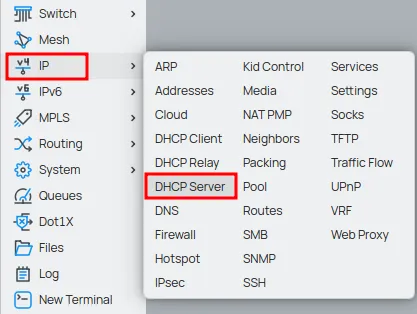
In the “DHCP” tab, click the red DHCP Setup button.
The wizard will guide you. The default values are usually correct, but pay attention.
- DHCP Server Interface: Choose the interface where the server will run (the same as in Step 1, e.g.,
ether2). Click Next. - DHCP Address Space: Winbox detects the network (
192.168.88.0/24). Just confirm. Click Next. - Gateway for DHCP Network: Confirm the gateway IP (
192.168.88.1). Click Next. - Addresses to Give Out (IP Pool): Here you define the range of IPs to be distributed. The wizard suggests almost the entire network (e.g.,
192.168.88.2-192.168.88.254). It is good practice to restrict this range to reserve IPs for servers or printers. Change it to something like192.168.88.100-192.168.88.254. Click Next. - DNS Servers: Enter the DNS servers. The wizard suggests the gateway itself. Add a reliable public DNS, like Cloudflare’s (
1.1.1.1) or Google’s (8.8.8.8), as a secondary. Click Next. - Lease Time: This is the IP “rental time”. The default of
10mis very short. Adjust as needed (see the best practices table below). A value of8h(8 hours) is a good start. Click Next.
After the last step, the configuration will be successfully completed!
DHCP Best Practices Table
| Parameter | Home Environment | Office Environment | Guest/Event Network |
|---|---|---|---|
| IP Pool | Wide (e.g., 100-254) | Restricted, with static IPs outside the pool | Wide, covering the expected number of users |
| Lease Time | Long (e.g., 1d or 24h) | Medium (e.g., 8h) | Short (e.g., 1h or 30m) |
| DNS Servers | Gateway + high-performance DNS (1.1.1.1) | Company’s internal DNS + public DNS | Public DNS only (1.1.1.1, 8.8.8.8) |
Troubleshooting: Solving Common DHCP Problems
Problem 1: The device does not receive an IP address.
- Check the “Leases” Tab: Go to IP > DHCP Server > Leases. If the device does not appear there, the problem may be physical or configuration-related.
- Solution 1 (Firewall): Check if there is a firewall rule blocking UDP ports 67 and 68 in your
inputchain. - Solution 2 (Wrong Interface): Confirm that the DHCP server was created on the correct interface (e.g.,
bridge-lanand not on an individualethernetport). - Solution 3 (Cable/Wi-Fi): Test the network cable or Wi-Fi connection. A physical problem is a frequent cause.
Problem 2: The device receives an IP but cannot browse the internet.
- Solution 1 (DNS): Did the client receive the DNS servers correctly? Check the device’s network settings. If not, review step 5 of the configuration.
- Solution 2 (Gateway): Is the gateway correct? The problem may be in your default route or NAT rule (masquerade). Go to IP > Firewall > NAT and ensure there is a
srcnatrule with themasqueradeaction for your internet interface (e.g.,ether1-wan).
How to Make an IP Reservation (Static IP)
To ensure a device (like a server or security camera) always gets the same IP:
- Go to IP > DHCP Server > Leases.
- Find the device in the list (it needs to have connected at least once).
- Double-click on it and click Make Static.
- The lease will become a static and permanent entry.
Continue your journey and master your network!
Now that your DHCP Server is distributing IPs, the next step is to understand how your MikroTik gets internet. Learn to configure the DHCP Client to connect to your provider. Then, ensure all your devices can browse with NAT Masquerade.
Read also:
- Unveiling the MikroTik DHCP Client: A Complete Guide with WinBox
- NAT Masquerade on MikroTik: Essential Connectivity for Your Network!
Conclusion: Mastering the DHCP Server on MikroTik
Mastering the DHCP server configuration on MikroTik is a fundamental step to creating a robust and professional network. With the help of Winbox and the tips in this guide, you can not only implement the service in minutes but are also prepared to troubleshoot problems and optimize your network with industry best practices.