The Magic of Automatic Network Configuration
In the world of networks, manual configuration of IP addresses, gateways, and DNS servers can be a tedious and error-prone task, especially in environments with many devices. This is where DHCP (Dynamic Host Configuration Protocol) comes into play, acting as a true maestro that orchestrates the automatic distribution of these essential information. For enthusiasts and professionals working with MikroTik equipment, understanding how to configure the DHCP client is fundamental to optimizing network management and ensuring fluid connectivity. This article has been carefully prepared to demystify the DHCP client configuration process on MikroTik devices, using the intuitive WinBox interface. Get ready to dive into a practical guide, full of valuable tips and information that will transform the way you interact with your MikroTik routers.
Why is the DHCP Client Your Best Friend in MikroTik?
Imagine the following situation: you need to connect a new device to your MikroTik network. Without the DHCP client, you would need to access the device, manually define the IP address, subnet mask, default gateway, and DNS servers. Now, multiply that by dozens or hundreds of devices. A headache is guaranteed, right? The DHCP client in MikroTik eliminates this complexity, offering a series of benefits that make it indispensable:
- Automatic and Uncomplicated Configuration: Say goodbye to manual data entry. The DHCP client automatically obtains all network information from a DHCP server, saving time and reducing the chance of typing errors.
- Dynamic IP Management: In networks where devices constantly enter and exit, the DHCP client ensures that IP addresses are assigned and released efficiently, avoiding conflicts and optimizing the use of the IP pool.
- Flexibility and Scalability: Whether in a small home network or a complex corporate environment, the DHCP client adapts to your needs, facilitating the expansion and maintenance of network infrastructure.
- Time Synchronization (NTP) and DNS: In addition to basic network parameters, the DHCP client can receive information about NTP (Network Time Protocol) and DNS servers, ensuring that your MikroTik devices have the correct time and can resolve domain names efficiently.
In summary, the DHCP client in MikroTik is not just a feature; it is a powerful tool that simplifies network administration, increases operational efficiency, and allows you to focus on more strategic challenges. Now that you understand the importance of this functionality, let’s get to what matters: practical configuration.
Configuring the MikroTik DHCP Client with WinBox: A Detailed Step-by-Step
WinBox is the preferred graphical tool for many network administrators to manage MikroTik devices, thanks to its friendly interface and robust features. Configuring the DHCP client via WinBox is a straightforward process that can be completed in a few minutes. Follow the steps below to get your MikroTik ready to receive network configurations automatically:
1. Accessing Your MikroTik via WinBox
The first step is to establish a connection with your MikroTik device. Make sure WinBox is installed on your computer and that your MikroTik is powered on and accessible on the network.
For this configuration scenario, Winbox version 4 was used, but the steps are similar for Winbox version 3.
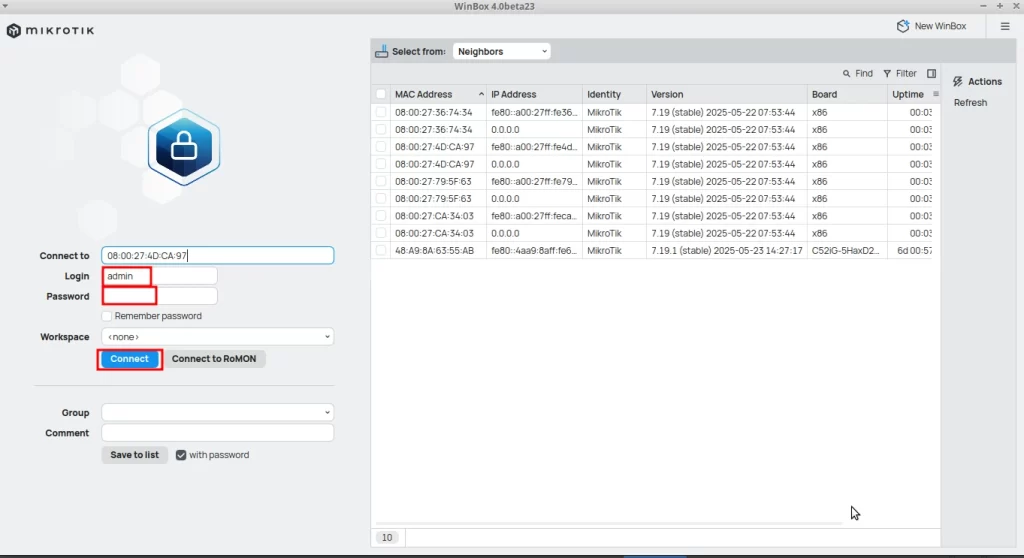
Open WinBox: Run the WinBox application.
Connect to your MikroTik: In the ‘Neighbors’ tab, WinBox will list the MikroTik devices detected on your network. You can connect using the MAC address (recommended for the first connection or when no IP is configured) or the router’s IP address. Enter your username and password (the default is admin and no password).
Click ‘Connect’: Once connected, the main WinBox interface will be displayed.
2. Navigating to DHCP Client Settings
With WinBox open and connected to your MikroTik, the next step is to locate the DHCP client configuration section.
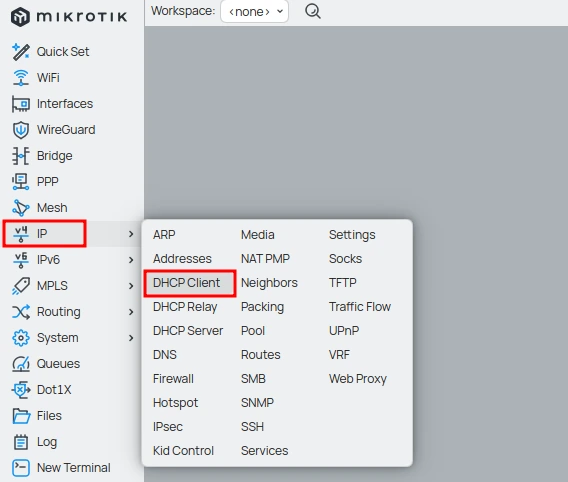
In the left sidebar menu, click ‘IP‘.
Then, click ‘DHCP Client‘. A new window, ‘DHCP Client’, will open, showing existing DHCP client configurations (if any).
3. Adding a New DHCP Client
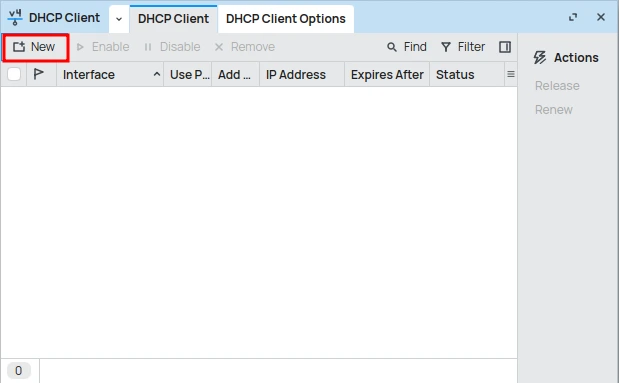
Now it’s time to add a new DHCP client entry for the desired interface.
Click the ‘+’ button (Add New): This will open the ‘New DHCP Client’ window.
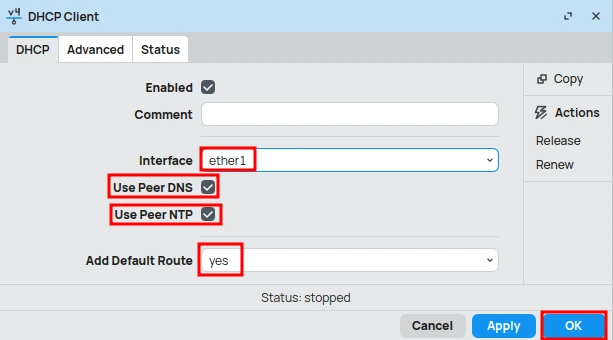
Select the ‘Interface’: In the ‘Interface’ field, click the down arrow and choose the network interface on which the DHCP client will be activated. This is usually the interface connected to your WAN (Internet), such as ether1 or wlan1.
Configure Essential Options:
- ‘Add Default Route’: Leave this option checked as yes. This ensures that MikroTik automatically adds a default route for the gateway provided by the DHCP server, allowing your router to access the internet.
- ‘Use Peer DNS’: Keep this option checked as yes. This will make MikroTik use the DNS servers provided by the DHCP server, ensuring domain name resolution.
- ‘Use Peer NTP’: If you want MikroTik to synchronize its clock with an NTP server provided by DHCP, keep this option checked as yes.
Click ‘OK’: After configuring the options, click ‘OK’ to save and activate the new DHCP client.
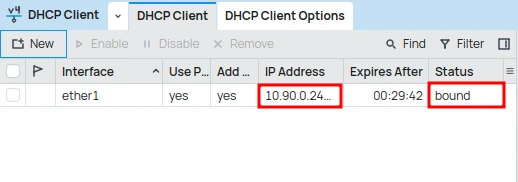
4. Checking DHCP Client Status
After adding the DHCP client, it is crucial to check if it has obtained an IP address and if it is working correctly.
In the ‘DHCP Client’ window: Observe the list of DHCP clients. The status of the DHCP client you just configured should change to bound.
Check the IP Address: In the same line as the DHCP client, you will see the IP address that was assigned to your MikroTik by the DHCP server, along with the gateway and DNS servers.
Congratulations! Your MikroTik is now configured as a DHCP client and is ready to automatically obtain network configurations. This process greatly simplifies the management of your WAN connections and ensures that your router always has updated network information.
Conclusion: Simplifying Your Network with the MikroTik DHCP Client
Configuring the DHCP client in MikroTik, especially with the ease that WinBox offers, is a fundamental step for any network professional or enthusiast looking to optimize the management of their infrastructure. By automating the assignment of IP addresses and other network parameters, you not only save time and effort but also minimize the occurrence of errors and ensure more robust and reliable connectivity.
We hope this detailed guide has unveiled the secrets of the MikroTik DHCP client, empowering you to implement this functionality with confidence and efficiency. Remember: a well-configured network is the foundation for exceptional performance. Start applying this knowledge today and elevate your telecommunications skills to a new level!
Discover the EMNews blog and stay updated with the latest news, insights, and trends in the world of technology and telecommunications!
For more details and advanced features, visit the official DHCP documentation on the MikroTik website and deepen your knowledge.